Admin Companion - Documentation
This is the newest version of the documentation for client versions 6.0+
Click on the version numbers to get to older version's documentations: 5.4 5.0 - 5.3 4.0 3.1 - 3.2 3.0 2.3 2.0 - 2.2 1.xContent
- Admin Companion Client
- Admin Companion Gateway
- Web Console
Admin Companion Client - Documentation (ai and ac-ops)
Network Flow
The Admin Companion client needs to be able to send POST requests to and receive answers from these two Admin Companion API endpoints:
https://api.admin-companion.ai:443/dialogue/*https://api.admin-companion.ai:443/search/*
Make sure your firewalls do not block this traffic.
Simplified network flow:

Quickstart
- Register for an Admin Companion account.
- Create an API key on the API Keys page in the web console (you need to log in to get there).
- Install the client software on your system. To do so, follow the instructions on the download page for your operating system.
-
Configure the client using the API key.
There are three locations where you can set the API key.
Choose one of the following options:
-
Environment variable (user specific)
Set an environment variableADMIN_COMPANION_KEYto the API key value:
export ADMIN_COMPANION_KEY="<Your API key>"
To make this persistent, add the command to your shell configuration file, for example$HOME/.bashrcfor bash. Use your own shell's resource file.
Remember to restart your shell or runsource $HOME/.bashrcafter changing the file.
You can check whether the environment variable is set by runningecho $ADMIN_COMPANION_KEYin your shell. It should return the API key value. -
File
Add a line in the format$HOME/.admin-companion/api-key(user specific)
ADMIN_COMPANION_KEY="<Your API key>"
in the file$HOME/.admin-companion/api-key
You can add additional lines starting with a hash sign (#). These lines will be ignored by the client software.
Make sure the file is readable only by you, for example withchmod 600 $HOME/.admin-companion/api-key. -
File
Attention: This option can be a security risk because every user on the system can see the API key./etc/admin-companion/api-key(system wide)
Add a line in the format
ADMIN_COMPANION_KEY="<Your API key>"
in the file/etc/admin-companion/api-key
You can add additional lines starting with a hash sign (#). These lines will be ignored by the client software.
The file needs to be readable by everyone, but should be writable only by root, for example with:
chown root:root /etc/admin-companion/api-key
chmod 644 /etc/admin-companion/api-key
-
-
Call, for example:
ai "Are you there?"
to verify that Admin Companion is responding.
Try using your request in your own language. It will work the same way:
ai "¿Estás ahí?"
ai "Est-ce que tu es là?"
ai "Bist du da?"
-
If it does not work correctly, check the Admin Companion log file at
$HOME/.admin-companion/admin-companion.logfor details.
Modules
ai: Interactive co-admin with human-in-the-loop enforcement
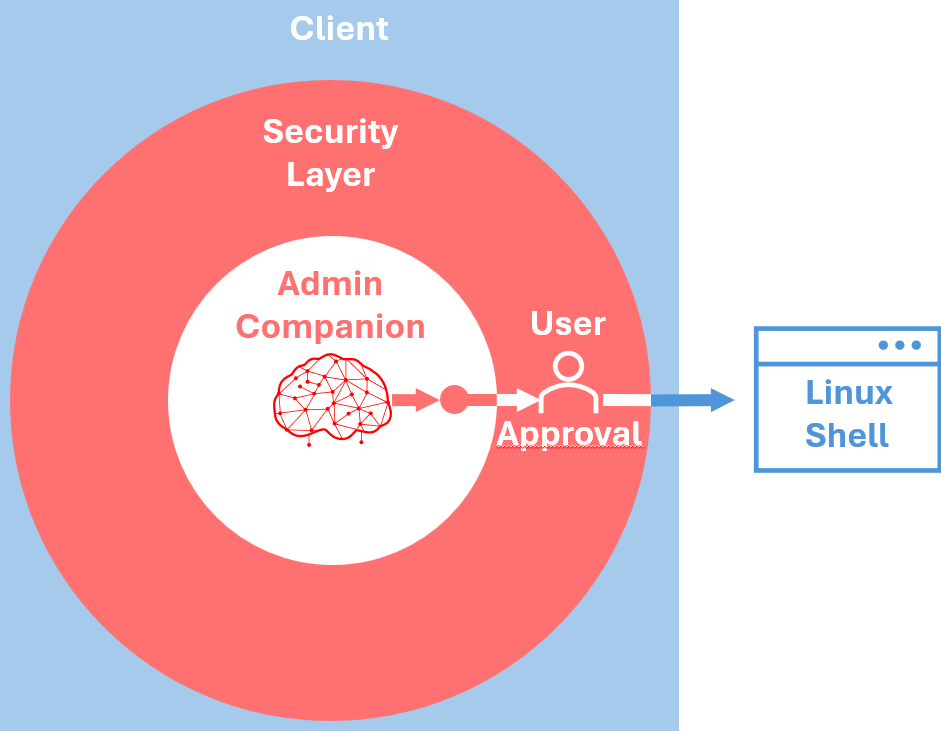
Security Layer
The client software has a built-in security layer, which ensures, that only user-approved commands can be executed.
The Artificial Intelligence does never directly interact with the system. It only can communicate with the security layer of the client software. This security layer assures the user's approval before any command execution.
Using the client
You can invoke the Admin Companion client with the command: ai
Usage: ai [options] | [max request token size] [model] [natural language request]
You only can give either an option or a natural language request, but never both at the same time.
[options]: See Command Line Parameters below
[max request token size]: -s <number of tokens> or --size <number of tokens>:
The remembered dialogue cannot be longer than the "max request token size". When it gets longer, elder messages in the dialogue "fade out" from memory.
The standard "max request token size" is defined in the configuration file.
With this parameter you optionally can set another "max request token size" for this single request.
You might want to choose a smaller "max request token size" to safe tokens (billing is based on number of input tokens and completion tokens per request).
You might want to choose a bigger "max request token size", if you temporarily need to process more information or want to remember a longer dialogue history.
[model]: -m <model-name> or --model <model-name>:
If you don't specify a model, the backend default is used. The response header shows which model was used.
Sample:
ai -m gpt-5-mini "Are you there?"[natural language request]:
- Give your instruction in clear text on the command line
- The cleanest way is tu use quotes around your instruction:
ai "I'd like to create a backup script with 10 rotating files for the content of the path /mnt/data"
This way, you can use all characters in your instruction without any problems.
-
If you don't quote the request, please be aware that the shell interprets your input as parameters to the command.
This means for example:- You need to escape brackets:
Not:ai find and list the configuration files of the application xyz (you find the application in /usr/xyz)
But:ai find and list the configuration files of the application xyz \(you find the application in /usr/xyz\)
- Consider, that quotes are interpreted from the shell as quotes, which need to be closed again:
Not:ai I'd like to create a backup script with 10 rotating files for the content of the path /mnt/data
But:ai I would like to create a backup script with 10 rotating files for the content of the path /mnt/data
...or just close the quote again at the end of the line. Not nice, but works:
ai I'd like to create a backup script with 10 rotating files for the content of the path /mnt/data'
...or just enclose the everything with quotes:
ai "I'd like to create a backup script with 10 rotating files for the content of the path /mnt/data"
- Consider, that * and ? are replaced by the shell wich the respectively filtered content of the current directory.
- You need to escape brackets:
- Start
aiwithout any parameter and enter your instruction interactively:-
In this case, the Admin Companion client requests you to enter your instructions, which then can be multi line (just press "Enter" to go to the next line). Here you can even copy files as parts of the instructions. When you want to end your instruction, just send an EOF (End-Of-File), by pressing "Ctrl-D" at the beginning of a line.
                                        $ ai

                                        Edit your input below. Submit with Alt+Enter:

                                        I'd like to create a backup script.

                                        I want to backup: /mnt

                                        Please tar zip the files

                                        The tarball should be written to /backup

                                        <Alt-Enter>
-
In this case, the Admin Companion client requests you to enter your instructions, which then can be multi line (just press "Enter" to go to the next line). Here you can even copy files as parts of the instructions. When you want to end your instruction, just send an EOF (End-Of-File), by pressing "Ctrl-D" at the beginning of a line.
Samples:
ai "Are you there?"ai -s 100000 "Are you there?"
Admin Companion works with "max request token size", which is counted in tokens (one token equals to approx. 0.75 words).
The remembered dialogue cannot be longer than the "max request token size". When it gets longer, elder messages in the dialogue "fade out" from memory.
The standard "max request token size" is defined in the configuration file.
With -s you can set another "max request token size" for this single request.
You might want to choose a smaller "max request token size" to safe tokens (billing is based on number of in and out tokens per request).
You might want to choose a bigger "max request token size", if you temporarily need to process much information or want to remember a longer dialogue history.
ai -vai -t "We analyze an issue with our web server not reacting to requests on port 443."
This sets a topic which is remembered and never fades out from memory until you clear it with the -rt parameter.ai
This lets you enter the request interactively.
Command Line Parameters
-h or --help
Display the help text-l or --list
Show the stored dialogue history-c or --clear-messages
Clear the dialogue history. This makes sense to start a new topic and make Admin Companion forget the previous conversation. Also reduces the number of tokens and therefore the cost for the request.-b [<background>] / --set-background [<background>]
This sets background information about your system for Admin Companion.
Admin Companion knows (nearly) everything about Linux, but it doesn't know your specific system or setup. If you want Admin Companion to know some specific information about your system or setup, you can set this as a background information with this option.
The information will be injected in every request you send to Admin Companion.
For example you could tell, when you use apache2 or nftables in contrary to nginx or iptables. Or when you have non-standard directories for some log files. Then Admin Companion does not have to investigate the system, when you are wokring in ths area.
Note: When using this option, it must be the last option on the command line. The background can be given on the command line or you can leave the background empty, then you are requested to input the request interactively. Do not include the <> brackets in the background.-rb or --remove-background
Removes the background information permanently, which has been set with -b or --set-background previously.-sb or --show-background
Shows the currently set background information.-t [<topic>] / --set-topic [<topic>]
This sets a topic for Admin Companion.
The topic does not "fade out" from the dialogue but will stay in memory of Admin Companion. So, on long tasks, the focus stays on this topic.
Note: When using this option, it must be the last option on the command line. The topic can be given on the command line or you can leave the topic empty, then you are requested to input the request interactively. Do not include the <> brackets in the topic.-rt or --remove-topic
Removes the general topic, which has been set with -t or --set-topic previously.-st or --show-topic
Shows the currently set topic.-rm or --remove-memory
Removes all information from the long term memory.-sm or --show-memory
Shows the content of the current long term memory.-er or --enable-use-release
Enable retrieving and sending the OS release number to allow Admin Companion to tailor the answers better to your OS release. This setting is stored persistently and used for future requests.-dr or --disable-use-release
Disable retrieving and sending the OS release number. With this setting, Admin Companion's answers will be more general. This setting is stored persistently and used for future requests.-ek or --enable-knowledge
Enable using the internal knowledge. [Default]-dk or --disable-knowledge
Disable using the internal knowledge.-ec or --enable-citations
Enable showing citations in the conclusion (internal knowledge). [Default]-dc or --disable-citations
Disable showing citations in the conclusion.-v or --version
Show the version and revision of the client software.
ac-ops: Policy-enforced AI automation (guard-railed by design)
What ac-ops is
ac-ops is a policy-enforced automation client for operational workflows. It is not a general-purpose agent: it can only act through tools that are explicitly allowed by a selected use-case configuration (YAML).
Use it to embed LLM assistance into automation (cripts, cron jobs, DevOps, CI pipelines, incident runbooks) with:
- a fixed use-case boundary (YAML)
- an allowlist of tools (and
run_asrules) - per-tool parameter restrictions (allow/deny)
- stdout output intended for automated pipelines
High-level workflow:
- Select a use-case YAML that defines allowed tools, guardrails, and a default instruction for the LLM.
- Provide an optional event payload (e.g. an error log).
ac-opssends the instruction + payload to the backend LLM.- The backend may request tool executions;
ac-opsexecutes only tools allowed by the use-case. - The final answer is streamed to stdout for downstream processing in the pipeline
Quick start
Prerequisites (/etc/admin-companion/admin-companion.cfg):
ADMIN_COMPANION_DIALOGUE_APIADMIN_COMPANION_DIALOGUE_API_VERADMIN_COMPANION_KEY(API key)
Sample call with vendor defined use-case (event from stdin):
The call below needs docker to be installed on the machine.
It reads the sample docker error event from stdin and will try to find evidenves on your machine, which obviously will not be found. Give it a try.
It has console debugging activated, so you see a live execution transcript on the console. This mixes with the ac-ops output, and is not intended to be used in production use.
Replace <prefix> with /usr (or /usr/local for FreeBSD). This depends on the OS standard installation locations.
ac-ops \
  --use-case <prefix>/libexec/admin-companion/ops/use-cases/docker-issue-analysis.yaml \
  --event - \
  --debug-console \
  <<'EOF'
2026-02-20T17:35:02.458350834Z container die 7af8edcbaaac4000d38709787d6241a20715e48d476ca7d7d44446257d2175ac (exitCode=1, image=alpine:3.19, name=acme-crm)
EOF
Alternatively stream your own real Docker error message into the use case.
Sample call with a user-defined use-case:
Create a file /etc/admin-companion/ops/use-cases/test-ls-path.yaml with this content
id: test.ls.path.v1
description: Execute the tool LsPath for testing
# Whether to use Admin Companion's internal knowledge base
use_internal_knowledge: true
# Whether to use this client's platform release information to tailor LLM's answers better to this system
use_platform_release_information: true

instruction: |
  Execute the tool LsPath twice for testing purposes:
  - Once with disallowed parameter /var/log/apache2
  - Once with allowed parameter /var/log
  Show a summary of what you find.
  Rate, whether the output is what you expected and why.
output_mode: text

tools:
  - name: LsPath
    run_as: sudo

tool_config:
  LsPath:
    restrict:
      path:
        match: path_prefix_real
        allow:
          - /var/log
        deny:
          - /var/log/apache2
Then execute this command:
ac-ops --use-case /etc/admin-companion/ops/use-cases/test-ls-path.yaml --debug-console
Command line interface
Synopsis
ac-ops --use-case PATH [--event PATH|-] [--ssh-restricted] [--debug-console] [instruction]
Options
-
--use-case PATH-
Required.
-
Path to a use-case YAML (see below).
-
-
--event PATH|--
Optional.
-
Adds an event payload to the request.
-
Use
-to read from stdin.
-
-
--ssh-restricted-
Optional.
-
Use this when
ac-opsis executed via SSH forced-command mode (for example via theForceCommanddirective insshd_config, or viacommand="ac-ops --ssh-restricted"inauthorized_keys). -
In this mode,
ac-opsreads the real CLI args fromSSH_ORIGINAL_COMMANDand expects the event payload on stdin (use--event -).
-
-
--debug-console-
Optional.
-
Prints a human-readable execution transcript to stdout, including:
-
request context (use-case ID, instruction, event payload)
-
each tool run (tool name, whether it ran as user or sudo)
-
tool stdout/stderr (bounded; optionally redacted)
-
-
-
instruction(positional)-
Optional.
-
Overrides the use-case’s default instruction.
-
Exit codes
0- request finished successfully2- invalid arguments/config, missing backend environment, backend/tool-loop error
Configuration loading and API key precedence
At startup ac-ops loads the configuration:
1) API key (only if ADMIN_COMPANION_KEY is not already set in the environment):
~/.admin-companion/api-key/etc/admin-companion/api-key
2) config file:
/etc/admin-companion/admin-companion.cfg
The config file does not override variables already set in the environment.
Why use-cases exist
Use-cases are the safety and repeatability boundary for automation.
A use-case exists to:
- restrict which tools the assistant may use (principle of least privilege)
- define whether a tool runs as
useror via passwordlesssudo - define per-tool guardrails (example: which directories
FileQuerymay read) - provide a stable default instruction so repeated runs behave consistently
Tool implementation overview
The definition of a tool follows this chain:
-
Implementation (only needed for user-provided tools. No implementation work is needed if you use vendor-shipped tools and vendor-shipped use-cases unchanged.)
a. Define tool's functionality and parameters (
.../admin-companion/ops/tools-spec/)b. Implement tool wrapper for example as a shell script which consumes the parameter above and implements the defined functionality (
admin-companion/ops/tools-bin/)c. Register tool to ac-ops and map it to executable wrapper (
.../admin-companion/ops/tools.yaml)d. Allow tool and define policies in the use-case (
.../admin-companion/ops/use-cases/) -
Execution
a. Your machine invokes ac-ops with a use case.
b. Reqest is dent to the LLM
c. LLM wants to execute a tool
d. ac-ops checks tool is allowed for the use-case and call follows policies
e. If so, executes the wrapper script (
.../admin-companion/ops/tools-bin/)
Vendor provided tools reside in <prefix>/libexec/admin-companion/ops/...
Admin overrides and additional admin provided tools reside in: /etc/admin-companion/ops/...
<prefix> is /usr or /usr/local depending on where ac-ops is installed.
Hint
The structures under <prefix>/libexec/admin-companion/ops (vendor-provided) and /etc/admin-companion/ops (override and user defined) are identical.
You can look into the vendor-provided tools to learn about how to implement tools in the override and user defined directory.
Ops tool wrapper conventions
Ops tools are executed locally by ac-ops as external wrappers under:
- Vendor defaults:
<prefix>/libexec/admin-companion/ops/tools-bin/<impl> - Admin override and additional admin provided wrappers:
/etc/admin-companion/ops/tools-bin
<prefix> is /usr or /usr/local depending on where ac-ops is installed.
Argument mapping:
- Backend tool calls send
argumentsas JSON to ac-ops. - The client translates JSON args into CLI flags:
- string or number:
{"unit":"docker.service"}->--unit docker.service - boolean true:
{"full":true}->--full - boolean false or unset: flag omitted
Wrapper implementation conventions:
- wrappers are POSIX
shscripts and can optionally source"$DIR/lib/common.sh"(shipped undertools-bin/lib/common.sh) --helpand-hcan be supported via common.sh helper_ac_handle_help usage "$@"and an admin provided usage function- argument parsing can use
_ac_parse_argsand validators fromlib/common.sh - wrappers must be read-only and must not invoke interactive commands (e.g. prefer
--no-pager)
To see, how the helpers in common.sh can be used, it's best to review some vendor provided implementations.
Ops tools
Available tools are declared in the local tool registry (tools.yaml). Only these tools can be used by a use case definition.
- Vendor default:
<prefix>/libexec/admin-companion/ops/tools.yaml - Admin override:
/etc/admin-companion/ops/tools.yaml
Most tools are executed via local wrapper implementations under tools-bin/.
- Vendor default:
<prefix>/libexec/admin-companion/ops/tools-bin/ - Admin override and additional admin provided tools:
/etc/admin-companion/ops/tools-bin/
FileQuery is a builtin-security tool implemented in the client (no external wrapper).
Current tool names:
DockerEventsDockerInfoDockerInspectDockerLogsDockerNetworkInspectDockerNetworkLsDockerPortDockerPsDockerStatsSnapshotDockerSystemDfDockerVolumeInspectDockerVolumeLsFileQueryJournalctlUnitSystemctlStatus
Use-case YAML
A use-case YAML defines:
id: stable identifierdescription: short text, only for documentation purposesuse_internal_knowledge: true|false -> Define, whether Admin Companion's internal knowledge base shall be used or notuse_platform_release_information: true|false -> Define, whether ac-ops should retrieve OS and release locally and send this information to the LLM (to tailor answers better to the system)instruction: default instruction for the LLM (can be overridden by positionalinstructionto theac-opscommand)background: optional background context (e.g. specific system configurations, pathes, etc.) passed to the LLM (use-case specific)output_mode: text|json -> hint to the LLM how to format the final answertools: allowed tools and how they run (run_assudo|user)tool_config: per-tool policies
Locations:
- Vendor default:
<prefix>/libexec/admin-companion/ops/use-cases/*.yaml - Admin override and additional admin provided tools:
/etc/admin-companion/ops/use-cases/*.yaml
tool_config policies (syntax and semantics)
tool_config defines per-tool parameter restrictions as policies. Restrictions are expressed as allow/deny lists per parameter.
Syntax:
tool_config:
  <ToolName>:
    restrict:
      <param>:
        match: exact | path_prefix_real  # optional
        allow:
          - <string>
          - <string>
          - ...
        deny:
          - <string>
          - <string>
          - ...
Semantics:
- If
tool_configis missing for a tool, orrestrictis missing, orrestrict.<param>is missing: that parameter is unrestricted. - If
restrict.<param>is present: - deny wins: if the value matches an entry in
deny, the call is being rejected byac-ops. - if
allowis non-empty: the value must match one entry inallow. - if
allowis empty: the parameter is effectively denied (deny-all). - Values are strings. Wrappers may apply additional validation (example: unit name format).
Matching:
matchcontrols how allow/deny entries are interpreted byac-ops:- Supported match modes:
exact(default): exact string match.path_prefix_real: treat allow/deny entries as absolute directory prefixes; the requested path is canonicalized (real path) and must be under an allowed directory.- If
matchis omitted, it defaults toexact. - FileQuery special case:
FileQuery.restrict.pathalways usespath_prefix_real.- The user cannot change this match mode.
Enforcement:
- All
tool_config.<Tool>.restrict.*rules are enforced client-side before executing external tools. - FileQuery is a builtin-security tool and additionally enforces its fixed
match: path_prefix_realsemantics.
Note: tool_config is injected into tool descriptions sent to the LLM. Keep it short.
Hard limit: 32768 bytes (JSON-serialized). But should be far smaller!
use-case background
Use-cases may define background (free-form text) to provide stable context to the LLM for that use-case.
- It is sent to the LLM.
- It should contain environment facts and constraints that are not part of the event payload.
- Improve it iteratively: run the use-case, review the result, then refine
backgroundbased on what was missing or unclear. - Keep it short and actionable.
Important note about output_mode
output_mode is only a hint to the LLM. It improves consistency but is not a hard guarantee.
Your automation should be prepared to handle:
- non-JSON output even when
output_mode: json - additional explanatory text
If you require strict machine-readable outputs, add validation in your pipeline step.
Example usecase yaml file
id: docker.issue.analyze.v2
description: Analyze a Docker issue from an event payload (log line/snippet)

# Whether to use Admin Companion's internal knowledge base
use_internal_knowledge: true

# Whether to use this client's platform release information to tailor LLM's answers better to this system
use_platform_release_information: true

# This use case is intended for root cause analysis based on a Docker error snippet.
# Ths error snippet is either piped into ac-ops via --event - or by providing it in a file via --event <filename>

background: |
  The docker installation is fully local.
instruction: |
  Analyze the provided Docker event/log snippet.
  By collecting evidence via allowed tools, identify the likely root cause of the issue as well as the proposed steps to fix it.
  Output the results as ticket to an Administrator, which handles the issue then.
  Format of the ticket:
  ```TICKET
  Use Case: <use case id>
  Event: <dump of the event>

  Result of the first analysis:
  <result of your analysis>```

output_mode: text

tools:
  - name: DockerInfo
    run_as: sudo
  - name: DockerPs
    run_as: sudo
  - name: DockerInspect
    run_as: sudo
  - name: DockerLogs
    run_as: sudo
  - name: DockerEvents
    run_as: sudo
  - name: DockerStatsSnapshot
    run_as: sudo
  - name: DockerNetworkLs
    run_as: sudo
  - name: DockerNetworkInspect
    run_as: sudo
  - name: DockerPort
    run_as: sudo
  - name: DockerVolumeLs
    run_as: sudo
  - name: DockerVolumeInspect
    run_as: sudo
  - name: DockerSystemDf
    run_as: sudo
  - name: SystemctlStatus
    run_as: sudo
  - name: JournalctlUnit
    run_as: sudo

  - name: FileQuery
    run_as: sudo

tool_config:
  FileQuery:
    restrict:
      path:
        match: path_prefix_real
        allow:
          - /var/log
          - /etc/docker
        deny:
          - /var/log/apache2
  SystemctlStatus:
    restrict:
      unit:
        match: exact
        allow:
          - docker.service
          - containerd.service
Tools
Wrapper tools (client-executed)
Examples: DockerInfo, DockerPs, DockerInspect, ...
- The backend requests a tool run.
ac-opsresolves a local wrapper implementation undertools-bin/and executes it.- For these tools, the function specs are usually client-provided via
tools-spec/<impl>.yaml(see below). - The tool’s output is sent back to the backend to iterate with next steps.
Builtin-security tools
Currently: FileQuery
- Implemented in the client.
- Enforces an allow/deny policy from the use-case.
- Read-only and line-based.
- Output is bounded.
Tool registry and tool implementation
Tool registry: tools.yaml
ac-ops uses a local tool registry (tools.yaml) that maps tool name to:
impl: implementation script name (looked up undertools-bin/)timeout_seconds: max runtime for that tool
Search order for the tool registry:
- Vendor default:
<prefix>/libexec/admin-companion/ops/tools.yaml - Admin override:
/etc/admin-companion/ops/tools.yaml
<prefix> is /usr or /usr/local depending on where ac-ops is installed.
Remark
If you want to extend the vendor default tools.yaml, you must copy the file into the respective location in the Admin override directory and extend it then.
Otherwise you loose the vendor defined tools.
Search order for the implementation script:
- Vendor default:
<prefix>/libexec/admin-companion/ops/tools-bin - Admin override:
/etc/admin-companion/ops/tools-bin
<prefix> is /usr or /usr/local depending on where ac-ops is installed.
Registry structure:
builtin_tools:ac-opsbuilt-in tools- currently:
FileQuery(builtin-security) external_tools: tool implementations executed via an external wrapper on the client machine (either vendor-provided or user-defined)- examples:
DockerInfo,DockerLogs,SystemctlStatus,LsPath
Example:
builtin_tools:
  FileQuery:
    impl: <internal>
    timeout_seconds: 15

external_tools:
  DockerInfo:
    impl: DockerInfo
    timeout_seconds: 15
  LsPath:
    impl: ls_path_v1
    timeout_seconds: 10
What is <impl>?
<impl> is the filename of the tool implementation that is executed on the client.
Example:
- tool name:
DockerInfo <impl>:DockerInfo- executed path
.../admin-companion/ops/tools-bin/DockerInfo...follows the resolution described above.
Tool specs: tools-spec/<impl>.yaml
For tools whose function specs are client-provided ("external_tools" in tools.yaml), the
specs are stored as separate YAML files by implementation name:
-
Vendor provided:
-
/usr/libexec/admin-companion/ops/tools-spec/<impl>.yaml -
or
/usr/local/libexec/admin-companion/ops/tools-spec/<impl>.yaml
-
-
Admin override or additional admin provided tools:
/etc/admin-companion/ops/tools-spec/<impl>.yaml
File format:
description: <string>
parameters:
  type: object
  properties:
    <param>:
      type: <string|integer|boolean>
      description: <string>
      # Optional JSON-schema fields:
      # ATTENTION:
      # These fields are only a weak guidance for the LLM, not hard constraints for execution
      # Hard constraints need to be managed either in the use-case definition or in the execution wrapper!
      # enum: [..]
      # minimum: <int>
      # maximum: <int>
    ...
  required: [<param>, ...]   # optional
Notes:
- Per-parameter
descriptionis recommended (it helps the LLM use the tool correctly).
Implementation lookup order
When executing a tool, ac-ops resolves the implementation in this order:
1) admin override
- /etc/admin-companion/ops/tools-bin/<impl>
2) vendor default (based on install prefix)
/usr/libexec/admin-companion/ops/tools-bin/<impl>- or
/usr/local/libexec/admin-companion/ops/tools-bin/<impl>
FileQuery (safe file inspection)
What it is for
FileQuery is a built-in tool without an external wrapper and is used by the assistant to inspect local files safely, typically logs.
It is designed to support:
- “show me the last N lines”
- “search for patterns with context lines”
- “show a line range”
Guardrails
- Read-only
- No shell execution
- Policy-enforced allow/deny directories (deny wins)
- Output is bounded
- Timeout enforced client-side
Reading FileQuery activity in ac-ops logs
If debug/audit logging is enabled, you will typically see:
- which file path was requested
- which query was applied: a small, read-only DSL
- whether the output of line numbers were requested
- the bounded tool stdout/stderr (possibly redacted)
Logging and audit
ac-ops has 3 output channels:
- Primary output: written to stdout (text or json).
- Debug console transcript (optional): enabled with
--debug-console. - Debug and audit file logs (optional): configured via
/etc/admin-companion/admin-companion.cfg.
Overview
Debug log:
- Purpose: troubleshooting (more verbose, includes context and tool activity).
- Format: JSONL.
- Location:
- system:
/var/log/admin-companion/ac-ops.debug.jsonl - user:
~/.admin-companion/ac-ops/debug.jsonl
- system:
Audit log:
- Purpose: concise activity trail for automation runs.
- Format: JSONL.
- Location:
- system:
/var/log/admin-companion/ac-ops.audit.jsonl - user:
~/.admin-companion/ac-ops/audit.jsonl
- system:
Sample configuration
Following is a sample configuration, typically at the end of /etc/admin-companion/admin-companion.cfg:
# Debug log (JSONL)
ops.debug.enabled=true
ops.debug.destination=auto
ops.debug.max_bytes=1048576
ops.debug.backup_count=2
ops.debug.max_record_bytes=65536
ops.debug.redact=true

# Audit log (JSONL)
ops.audit.enabled=true
ops.audit.destination=auto
ops.audit.max_bytes=1048576
ops.audit.backup_count=2
ops.audit.max_record_bytes=65536
ops.audit.redact=true

# Audit elements (CSV)
# Note: if ops.audit.enabled=true and ops.audit.elements is empty/missing, ac-ops fails early.
ops.audit.elements=context,tool_call,tool_exec,tool_result,errors
Parameters
ops.debug.enabled / ops.audit.enabled
true|false- When disabled, the corresponding log is not written.
ops.debug.destination / ops.audit.destination
Where the JSONL log file is written:
system- write to
/var/log/admin-companion/... - must be writable, otherwise
ac-opsfails
- write to
user- write to
~/.admin-companion/... - best-effort; if not writable, logging is disabled
- write to
auto(default)- try system location first; if not writable, fall back to user location
- best-effort; if neither is writable, logging is disabled
ops.debug.max_bytes / ops.audit.max_bytes
- Maximum size of the JSONL log file before rotation.
ops.debug.backup_count / ops.audit.backup_count
- Number of rotated backup files kept.
ops.debug.max_record_bytes / ops.audit.max_record_bytes
- Max size of one JSONL record after truncation.
- This keeps logs bounded even when tool output is large.
ops.debug.redact / ops.audit.redact
true|false(default:true)- When enabled, values that look like secrets are redacted in debug and audit logs.
Audit element selection
ops.audit.elements
CSV list of audit elements to emit into the audit log. If an element is not listed, it is not written.
Currently emitted element names:
context- Use-case ID, run ID instruction, event metadata/payload.
tool_call- Tool call requested by the LLM (tool name, call_id, arguments).
tool_exec- How a tool was executed locally (run_as, impl path, argv, timeout).
tool_result- Tool exit code and bounded stdout/stderr.
errors- Errors in backend communication, tool execution, tool loop.
Redaction
When ops.*.redact=true, redaction is applied to debug and audit logs (and the debug console transcript).
Redaction is line-based and aims to remove secret values while keeping context.
Example:
password=supersecretbecomespassword= <redacted>
Troubleshooting
Missing backend configuration
If you see:
Missing ADMIN_COMPANION_DIALOGUE_API or ADMIN_COMPANION_DIALOGUE_API_VERMissing ADMIN_COMPANION_KEY
Set these in environment or /etc/admin-companion/admin-companion.cfg (and ensure the API key file exists).
Sudo failures
If a tool is configured with run_as: sudo:
- sudo is executed as
sudo -n(non-interactive) - passwordless sudo must be configured for the invoking user
FileQuery not_found / forbidden
not_found: file does not exist (strict path resolution)forbidden: path is outside allowlist or under denylist.

Admin Companion Gateway - Configuration Reference
This page documents how to configure Admin Companion Gateway.
Admin Companion Gateway is a lightweight webhook receiver and router: it accepts HTTP events (for example from Prometheus Alertmanager), normalizes them via profiles.yaml, and then invokes ac-ops on a target host via SSH in --ssh-restricted mode. Depending on the profile, it returns the ac-ops output and/or triggers post-actions (sinks) such as ServiceNow or Slack, while enforcing allow - deny policies for target hosts and use cases. Admin Companion Gateway is highly configurable and can integrate with a wide variety of input and output systems without requiring custom software development.
Contact us via our support form for consulting services for integration into your environment: https://www.admin-companion.ai/contact
For installation, see:
Contents
- Files and locations
- Security model (short)
- Gateway configuration (ac-ops-gateway.cfg)
- Profiles routing (ac-ops-gateway.profiles.yaml)
- Expression language
- Sinks (webhook - exec)
- Templating
Files and locations
After installation, these files matter most:
-
Gateway config (dotenv):
/etc/admin-companion/ac-ops-gateway.cfg
-
Profiles routing (YAML):
/etc/admin-companion/ac-ops-gateway.profiles.yaml
-
Secrets (mounted read-only into the container as
/run/secrets):/etc/admin-companion/ac-ops-gateway-secrets/
Security model (short)
-
Inbound:
- HTTP webhook endpoints require a bearer token.
-
Outbound:
- The gateway connects to the target host via SSH as user
acops. - The target host must enforce forced-command mode (
ac-ops --ssh-restricted).
- The gateway connects to the target host via SSH as user
The gateway additionally validates:
target_hostagainst allow - deny policies.use_caseagainst an allowlist.
Gateway configuration (ac-ops-gateway.cfg)
The gateway reads its config from /etc/admin-companion/ac-ops-gateway.cfg.
Common settings:
-
Listener:
AC_OPS_GATEWAY_LISTEN=0.0.0.0:8080
-
Profiles file:
AC_OPS_GATEWAY_PROFILES_YAML=/etc/admin-companion/ac-ops-gateway.profiles.yaml
-
Bearer token:
AC_OPS_GATEWAY_BEARER_TOKEN_FILE=/run/secrets/ac_ops_gateway_token
-
SSH:
AC_OPS_GATEWAY_SSH_USER=acopsAC_OPS_GATEWAY_SSH_PORT=22AC_OPS_GATEWAY_SSH_IDENTITY_FILE=/run/secrets/acops_gateway_ed25519AC_OPS_GATEWAY_SSH_KNOWN_HOSTS=/run/secrets/known_hosts(required only when strict host key checking is enabled; can be read-only)AC_OPS_GATEWAY_SSH_STRICT_HOST_KEY_CHECKING=true(recommended)- if set to
false, the gateway does not persist host keys (UserKnownHostsFile=/dev/null)
-
Policies:
AC_OPS_GATEWAY_TARGETS_ALLOW_CIDRS=...AC_OPS_GATEWAY_TARGETS_DENY_CIDRS=...AC_OPS_GATEWAY_USE_CASE_ALLOW=...(CSV orALL)AC_OPS_GATEWAY_USE_CASE_DEFAULT=...
Tip:
- Use the shipped template files as a starting point.
Profiles routing (ac-ops-gateway.profiles.yaml)
The profiles file defines:
- HTTP endpoints (paths)
- which profile processes each endpoint
- how to compute
target_host,use_case,stdin_payload - optional post-actions (sinks)
Top-level shape:
endpoints: [ {path, profile}, ... ]profiles: { <name>: <profile>, ... }
Profile fields:
-
Required:
target_hoststdin_payload
-
Optional:
use_casededup_key(if omitted, it defaults to an empty string)ctx_vars(optional computed variables exported to sink templates as${ctx.<name>})output
Expression language
An expression node is either:
- a string (shorthand for
const), or - a mapping with exactly one operator key, plus optional
transforms.
Operators:
-
path: <string>- path syntax:
a.b[0].cor$for the root object
- path syntax:
-
const: <scalar> coalesce: [<expr>, ...](first non-empty)join: {sep, parts}json_dump: {path: <path>}map: {key: <expr>, table: {...}, default: <value>}(exact match)
Transforms (strings):
trim,lower,upper,strip_portregex_sub: {pattern, repl}regex_capture: {pattern, group}truncate: <n>sha256_hex
Sinks (webhook - exec)
Sinks run after the remote ac-ops execution.
-
webhooksink:- sends an HTTP request (eg to Slack)
-
execsink:- runs a local command (advanced)
Output behavior:
-
output.return_result=true(default)- returns HTTP 200 with combined stdout - stderr and header
X-Exit-Code
- returns HTTP 200 with combined stdout - stderr and header
-
output.return_result=false- returns HTTP 204 if all sinks succeeded
- returns HTTP 502 if any sink failed
Option:
-
output.http_error_on_ac_ops_failure=true- if
ac-opsexits non-zero, the gateway returns HTTP 502 and skips sinks
- if
Templating
Sink bodies support string templating:
-
${ctx.<field>}ctx.target_host,ctx.use_case,ctx.dedup_keyctx.ac_ops_exit_code,ctx.ac_ops_output- plus any profile-defined
ctx_vars(for example:ctx.alertname_norm)
-
${in.<path>}- reads from the incoming JSON using the same
pathsyntax
- reads from the incoming JSON using the same
-
${file.<path>}- reads the first non-empty non-comment line from a file
Helpers:
${json_escape:<ref>}for embedding text into JSON string fragments${urlenc:<ref>}for URL encoding
Notes:
- Output templating intentionally supports only small helpers (
json_escape,urlenc). - If you need normalized fields (lowercase, strip_port, regex capture, etc), compute them in the profile via
ctx_varsand reference them as${ctx.<name>}.
Files used by Admin Companion clients
The following files and folders are used by Admin Companion. Some are shared across 'ai' and 'ac-ops' clients, others are client-specific.
- Common (ai, ac-ops)
- Folder:
$HOME/.admin-companion/api-key: Optional API key file. If ADMIN_COMPANION_KEY is set in the environment, this file is not used.
- Folder:
/etc/admin-companion/
admin-companion.cfg: Admin Companion configuration file.api-key: Optional system-wide API key file. If ADMIN_COMPANION_KEY is set in the environment, this file is not used.symlink_name: Internal file for installation/deinstallation. Never change this file.
- Folder:
/usr/bin/or/usr/local/bin/
This folder contains the executables (e.g. admin-companion, ai, and ac-ops).
- Folder:
- ai (interactive client)
- Folder:
$HOME/.admin-companion/admin-companion.log: Log file of the interactive client. The file is rotated with two files at a size of about 1M each.admin-companion.bill: This file logs for each request the number of tokens consumed. The file is rotated with two files at a size of about 1M each.conversation_history.pickle: This file stores the conversation history persistently (also across reboots).
- Folder:
- ac-ops (automation client)
- Folder:
/etc/admin-companion/ops/
Admin overrides for vedor-provided tools and additional user-defined tools.use-cases/: Use-case definitions (YAML) to define allowed tools and guardrails for ac-ops.tools.yaml: Tool registry (YAML) that defines available tools and their implementations.tools-bin/: Optional admin-provided tool wrapper implementations (executables).tools-spec/: Optional admin-provided tool specs (YAML) for external tools (client-provided function specs).
- Folder:
$HOME/.admin-companion/ac-ops/
User-level ac-ops debug and audit logs (when configured with ops.*.destination=user or ops.*.destination=auto and system destination is not writable).debug.jsonlaudit.jsonl
- Folder:
/var/log/admin-companion/
System-level destination for ac-ops debug and audit logs (when configured with ops.*.destination=system, or ops.*.destination=auto and writable).ac-ops.debug.jsonlac-ops.audit.jsonl
- Folder:
/usr/libexec/admin-companion/ops/or/usr/local/libexec/admin-companion/ops/
Vendor-provided ac-ops assets (tools.yaml, use-cases/, tools-bin/, tools-spec/). The exact prefix depends on installation location.
- Folder:
Web Console
Web Console - Dashboard
On the web console dashboard you see an overview of your balances and your usage on montly base (6 month) and daily basis (current calendar month).
Web Console - Requests
On this page you can see the meta date of the latest requests, which have been made on one of your API keys (without the contents of the request).
Web Console - API keys
API keys are used to authenticate the Admin Companion client's requests. Keep your API keys secret like a password!
You can create, manage and delete your API keys on the API Keys page in the web console.
You have the following options:
-
Create a new API key.
You need to give the API key a name to subsequently identify the key.
The API key will only be displayed once at creation time. Make sure to store it in a safe place. If you loose the API key, neither you nor us can restore it!
But you can delete and re-create API keys at any time. Be aware, that the key will be displayed on the screen. Make sure no unauthorized person can see your screen.
- Deactivate an API key temporarily by clicking on it's status symbol.
- Rename an API key by clicking on the pen symbol at the end of the line of an API key
-
Delete an API key permanently
A deleted API key cannot be restored. But you can create new API keys at any time
Web Console - My Profile
The My Profile page on the web console allows you to change your Name, VAT Id and Address. You cannot change your country, company name or email address.
Web Console - Account
This page shows your account balances. There are two balances:
- Expiring balance: This balance expires at the end of a billing cycle. At each start of a billing cycle, when you pay the recurring fee, this amount is reset to the recurring payment value.
You can then use that amount within the billing cycle by using Admin Companion. - Non-Expiring balance:
This balance will only expire, when your subscription is being cancelled. While you are subscribed to a plan, any remaining amount in this balance will be transferred to the next billing cycle.
When you choose the automatic refill feature (see below), any payments based on that will go into the non-expiring balance.
When you change your plan, you will immediately be charged the amount of the new recurring fee (without changing the date of the billing cycles). This fee will also go to the non-expiring balance.
Automatic Refill feature: Standard behaviour is, that in case of full consumption of all your balances, Admin Comanion client declines further requests with an "Account limit reached" message.
If you activate the Automatic Refill feature, Admin Companion automatically charges your payment method again, when you consumed all your balances within a billing cycle. Any refills go to the non-expiring balance, which follows the mechanisms, as described above.
Refill is always the same amount, as the recurring fee.
Don't forget to click on "Update Account Settings" after changing the auto-refill to become effective.
Transactions: On the Account page you also can see your last 30 transactions (like recurring payments, refills, payment method changes, etc.)
My Subscription
On the subscription page you see, which Plan you currently are subscribed to. You can activate a subscription, change to another subscription or cancel your subscription.
Change plan: When you change between the plans S, M, L, the recurring fee of the new plan is immediately charged to your stored payment method and added to the non-expiring balance (See "Account" for details). Your further usage then will be billed immediately at the unit price of the new plan.
Update payment method: On this page you can also update your payment method.
Cancel subscription: Cancellation will be scheduled to the end of the billing cycle. You can continue to use Admin Companion until the end of the billing cycle.
When your refill feature is activated, your payment method will still be charged for possible refill actions.
When you cancel a subscription, all non-expiring balance will expire at the end of the billing cycle.
Within the last about one hour before the end of a billing cycle, it is not possible to perform any changes on the subscription.
Your account will still be available for at least one year, so you can decide to subscribe to a plan later again.